Whittling is one of the oldest and simplest crafts that there is; it requires no specialist tools and uses materials that are available free of charge in the countryside.
I have wanted to include instructions for how to make a wooden spoon on the jamboree website for some time. I imagined I could do it point by point, like the other instructions on the site, but wood carving, I have discovered, isn't that sort of thing. Each piece of wood is so individual it would be impossible to give exact instructions of how to carve it.
So the instructions below are more of a general guide. Wood carving is obviously a craft best suited to older children, because of the sharp tools involved, but a younger child is sure to enjoy sanding the spoon until it is silky smooth.
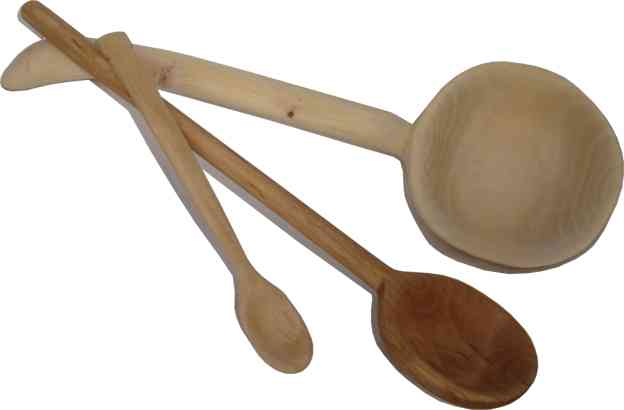
You can do a spoon any shape you want, and you will soon realise how many variations there are. Once you start working on your piece of wood it will probably decide for itself what shape it is going to be! I don't think there is anything wrong with this, it means that every spoon you make will be a completely individual masterpiece, unlike anything which can be bought from a shop.
Lastly, I have to say, that not only is a wooden spoon enormous fun to make, but it is enormous fun to use. It adds a whole new dimension of enjoyment into the cooking experience, and it also makes wonderful gift!
Making Wooden Spoons
The spoons pictured on this page were carved from elm and hazel logs: the trees were coppiced last year and the wood allowed to dry in the open air over the summer; they could equally well, however, have been carved out of a log selected from the wood pile.
Some woods (such as oak) are very hard, and therefore difficult to carve. For your first spoon try to find a wood which is softer. Ash is quite soft, and white coloured, elm is quite yellow, and hazel has a pinkish tinge. Don't use a scented wood like eucalyptus, or it might give a taste to your cooking!
A block of wood can be cut to approximately the right shape for the sort of spoon that you want to make with a saw; it should be free of knots and should not show signs of any splits.
Excess wood can be removed with a mallet and chisel, but once the spoon shape has been defined it is best to start working with a sharp knife - a sharp penknife, a craft knife or Stanley knife can all be used for this purpose.
It is probably advisable to shape the handle before you start to work on the bowl.
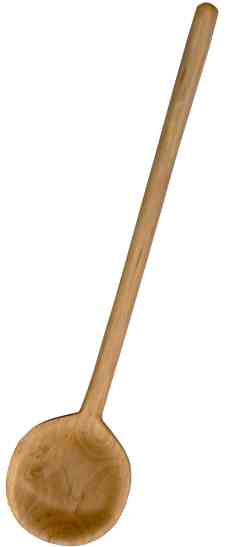
Opinions vary as to whether the inside or the outside of the bowl should be carved first - you will have to decide which approach suits you best. It is difficult to hollow out the inside of the bowl with an ordinary knife and it is advisable to purchase a gauge such as the one pictured on the right for this purpose, particularly if you intend to carve a spoon with a deep bowl.
The spoon can be smoothed with varying grades of emery paper, and finished off with fine sand paper.
For a perfect finish, wet the spoon, allow it to dry and then sand again; repeat this process a couple of times.
Finish off by rubbing olive oil into the spoon, which brings out the beautiful grain in the wood. You can oil your spoon from time to time.

This rounded chisel was used to carve out the bowl of the spoon on the right. |
 |