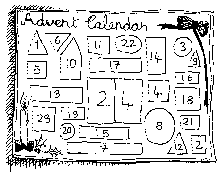

This project can be easy or difficult to do, because it is up to the person making it how advanced they want it to be. In our family, for many years, we made one for each other and left it by the bedside, as a surprise, to be found on the first of December. As the years have gone on, and art skills have improved, they have developed into quite an art form, and I think we have proved that there is no limit to the variations that can be made on this simple design!
You will need:
Two pieces of A4 paper (11½˝ x 8½˝). One must be white and the other can be coloured
A craft knife
Paper clips
Coloured pencils or crayons
Glue (Pritt, UHU, etc.)
Blue-Tak
Method:
Take the coloured sheet of paper and using a coloured crayon of your choice, draw 24 squares, oblongs or circles, or a mixture of all these. Take care to leave a border of 2 cm (¾
˝) around the edge of the paper. You may like to make the twenty-fourth shape larger than the others.Write the numbers from 1 to 24 on the shapes. These will be the doors of the advent calendar. (Diagram 1)
Diagram 1
Diagram 2Resting the sheet of paper on a piece of thick cardboard, or chipboard, cut along three sides of each of the doors with a craft knife. (It may be necessary to ask an adult to help with this). If cutting out circular doors, slice round approximately three quarters of the circle. Fold back the doors.
Place the first sheet of paper on top of the second, white piece of paper, and fasten it in place with paper clips. Take a pale-coloured crayon and draw round the inside of each of the doors. (Diagram 2)
Unfasten and set aside the first sheet of paper. Draw a picture inside each of the outlined shapes on the white piece of paper.
Glue around the edges of the white sheet of paper, and place the first sheet of paper on top of it. Press them together, to stick. The doors should now open onto the pictures.
Take a tiny amount of Blue Tak and stick down the doors. Fasten the advent calendar to a wall, or stand it up on a table, or shelf, and open a door on each of the 24 days leading up to Christmas.
Variations for a more elaborate Advent Calendar
There are many variations that can be made to the basic Advent Calendar.
You can draw a picture on the top sheet of paper, and incorporate the doors into this picture. For example, you can draw a house, and cut out the doors and windows; or you could draw a street scene and make the Christmas presents and parcels that people are carrying into doors.
You can also draw a picture of the sheet of paper underneath. For example, if there is a drawing of a castle on the top sheet, you can draw the inside of the castle on the bottom sheet, and incorporate the little pictures behind each of the doors into the larger picture. In this case, do not glue the two pieces together, instead stick them together with Blue Tak. On the 25th December the top pieces can be removed to reveal the picture underneath.
You can make up a story and write an instalment of it on the inside of each door, opposite the picture. The story can be tied in with the picture, and reach its climax on the 25th.
You can buy some sweets, or chocolates, and put them beside the calendar. One can be eaten every day, or every other day, if you prefer.